To improve security and protect DNS appliances and users from DNS-based
attacks, including protecting users from malicious websites, TCPWave includes Suricata, a powerful
and high-performance rule-based network threat detection and prevention system. Suricata can monitor network traffic, including DNS traffic, in real time to detect and prevent malicious activity. Administrators can create and import rules for Suricata, including from third parties, to drop specific packets and produce alerts on specific packets and series of packets. Also, rules can be used permanently or temporarily, such as while waiting for a security patch to be created, tested, and deployed after a new vulnerability has been identified.
A default ruleset for Suricata is included with TCPWave that consists of over 2,500 DNS-related rules that produce alerts. It is based on Proofpoint Emerging Threats Open Ruleset and can be modified. These default rules primarily detect protocol anomalies, higher than expected frequencies of specific packets and DNS queries, and queries for domains related to malware, ransomware, command and control, phishing, and tunnels.
These threat detection and prevention capabilities help protect DNS Appliances and users by using DNS-specific rules and considering traffic patterns that go beyond the functionality of general-purpose firewalls. To enable administrators to understand and take advantage of these
capabilities, information on the following topics is presented in the sections below:
- Overview of Suricata rules
- Configuring Suricata in TCPWave
- Viewing alerts and logs on threats
As described in the Introduction, Suricata uses rules to detect and drop malicious packets. More specifically, when a rule matches the contents of a packet or series of packets, Suricata can drop the potentially harmful packet(s) and generate an alert or just generate an alert. Suricata runs on TCPWave DNS Appliances, and Suricata alerts are displayed in the Fault Management section of TCPWave.
TCPWave customers can use the default Suricata ruleset included with TCPWave, rulesets from third parties, their own custom rulesets, or a combination of these. The default TCPWave ruleset consists of over 2,500 DNS-related rules that produce alerts and is based on Proofpoint Emerging Threats' Open Ruleset. These default rules primarily detect protocol anomalies, higher than expected frequencies of specific packets and DNS queries, and queries for domains related to malware, ransomware, command and control, phishing, and tunnels. After these rules are imported into a template in TCPWave, they can be viewed in the TCPWave GUI. Also, these rules can be viewed in the suricata-dns.rules file in the /opt/tcpwave/var/lib/suricata/rules directory on TCPWave IPAM Appliances.
For those interested in better understanding Suricata rules, overview information on two example rules from the TCPWave default ruleset and one custom rule is presented here. Rules consist of three parts, which are color-coded in the following example rule from the default ruleset:
alert dns any any -> any any (msg:"ET MALWARE Suspected Snugy DNS Backdoor Initial Beacon"; content:"|00 00 01 00 01|"; endswith; dns.query; bsize:>19; content:"646"; offset:2; depth:5; fast_pattern; pcre:"/^[qbedm]{1}[a-zA-Z]{1,3}646[a-zA-Z0-9]{1,3}+\./";reference:url,unit42.paloaltonetworks.com/xhunt-campaign-backdoors/;reference:md5,162959ebfd839229969d5e830c7d1dbc;classtype:command-and-control;sid:2031193;rev:2;metadata:attack_target Client_Endpoint,created_at 2020_11_09, deployment Perimeter, former_category MALWARE, performance_impact Low, signature_severity Major, updated_at 2021_04_09;)
A summary of the rule parts is as follows:
- Action: Specifies the action taken when a rule matches a packet. Values include Alert, Drop, and Reject.
- Header: Specifies the protocol, IP addresses, ports, and direction of the rule.
- Options: States the specifics of the rule.
Furthermore, in the Options part of a rule, various keywords can be used, and these typically vary in different rules. The rule above is presented again, but this time with the keywords highlighted:
alert dns any any -> any any (msg:"ET MALWARE Suspected Snugy DNS Backdoor Initial Beacon"; content:"|00 00 01 00 01|"; endswith; dns.query; bsize:>19; content:"646"; offset:2; depth:5; fast_pattern; pcre:"/^[qbedm]{1}[a-zA-Z]{1,3}646[a-zA-Z0-9]{1,3}+\./";reference:url,unit42.paloaltonetworks.com/xhunt-campaign-backdoors/; reference:md5,162959ebfd839229969d5e830c7d1dbc;classtype:command-and-control;sid:2031193;rev:2; metadata:attack_target Client_Endpoint,created_at 2020_11_09, deployment Perimeter, former_category MALWARE, performance_impact Low, signature_severity Major, updated_at 2021_04_09;)
Note that as per the pcre keyword (which stands for Perl-compatible regular expression), part of the matching criteria in this example rule is a regular expression.
The following example DDoS rule, which is also from the default ruleset, considers the frequency that a matching packet occurs and will generate an alert only if there have been 10 or more DNS queries to ns1.hostasa.org within 2 minutes:
alert dns any any -> any any (msg:"ET MALWARE Likely Linux/Xorddos.F DDoS Attack Participation (ns1.hostasa.org)"; threshold:type both, track by_src, count 10, seconds 120; dns.query; content:"ns1.hostasa.org"; depth:15; fast_pattern;nocase; endswith; reference:md5,3c49b5160b981f06bd5242662f8d0a54; classtype:trojan-activity; sid:2021327; rev:5; metadata:created_at 2015_06_23, former_category CURRENT_EVENTS, updated_at 2020_09_17;)
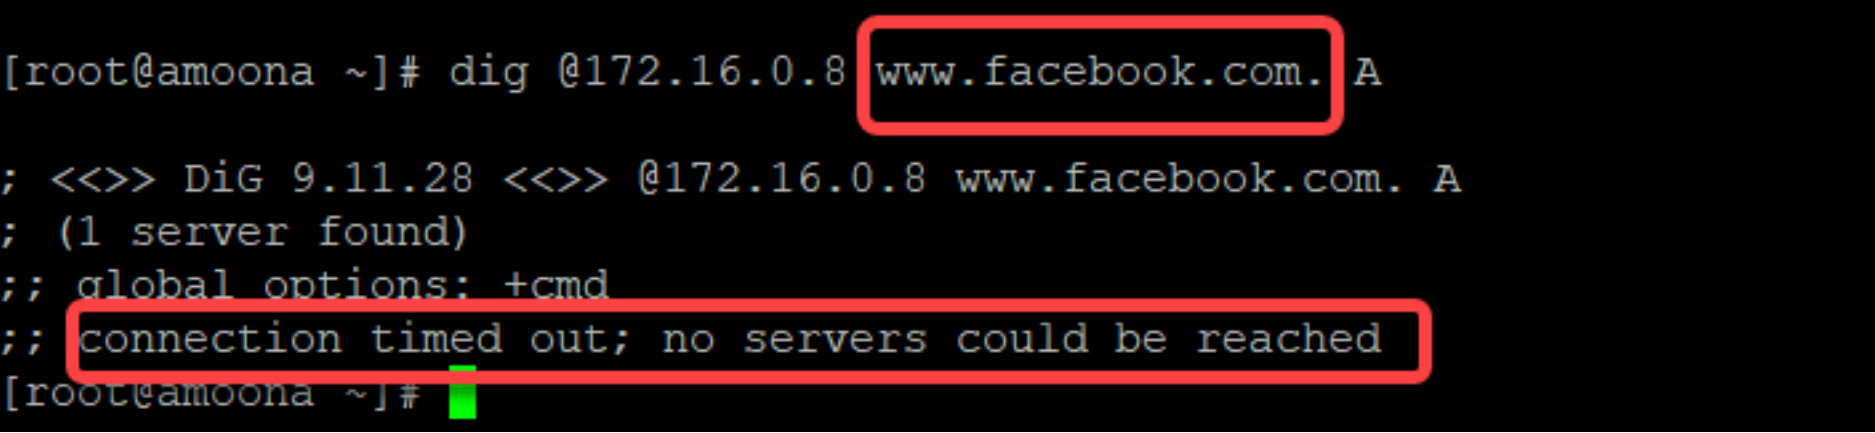
An example custom rule, which is not in the default rules, is shown below, and it drops DNS queries for www.facebook.com:
drop dns any any -> any any (msg:"TCPWave DNS TITAN This is a drop test for www.facebook.com"; dns_query; content:"www.facebook.com"; depth:20; fast_pattern; endswith; nocase; classtype:pup-activity; sid:200; rev:2;)
With this rule in use, the output of a query for www.facebook.com from a dig command is as shown in the screenshot below:
Note that since an Action of Drop was used in the rule, dig timed out waiting for a query response. If an Action of Reject were used, then in addition to the query being dropped, a rejection message would have been sent to the dig client.
Rules can vary greatly in their purpose and complexity. Complete information on Suricata rules, including on rule format and DNS keywords in rules, is in the Suricata User Guide in the section on rules, which is available at https://suricata.readthedocs.io/en/latest/rules/index.html.
Suricata is categorized as an Intrusion Prevention System (IPS), an Intrusion Detection System (IDS), and a Network Security Monitoring (NSM) system. However, for brevity, in the TCPWave GUI and documentation, it is referred to just as an IPS. To benefit from using Suricata, you first configure it in TCPWave as follows:
- Create a Network Security Monitoring (NSM) Template, and enable the Anomaly Detection option.
- Associate the NSM Template with one or more DNS appliances. An NSM Templates can be associated with the following types of appliances:
- ISC BIND Authoritative appliances with recursion enabled
- ISC BIND Cache appliances
- Unbound Cache appliances
Also, an NSM Template can only be associated with an Appliance in the same Organization as the Template.
Detailed information on these two configuration steps is provided in the subsections below.
Create a NSM Template
Associate an NSM Template with a DNS Appliance
- Go to Network Management >DNS Management > DNS Security > DNS Threat Management.
- Select the NSM Templates tab, and then Add
 .
.
-
On the NSM Configuration tab, enter values as needed, including the following:
- Enter the Network Interface name, such as eth0, that the Suricata rules will protect.
- (Optional) Disable Enable Anomaly Detection. This feature is for DNS tunnel detection and is unrelated to Suricata, as described in the TCPWave IPAM Administrator Reference Guide.
- Select Enable Intrusion Prevention.
Result: At the bottom of the NSM Configuration tab, the Rule Variables table is displayed

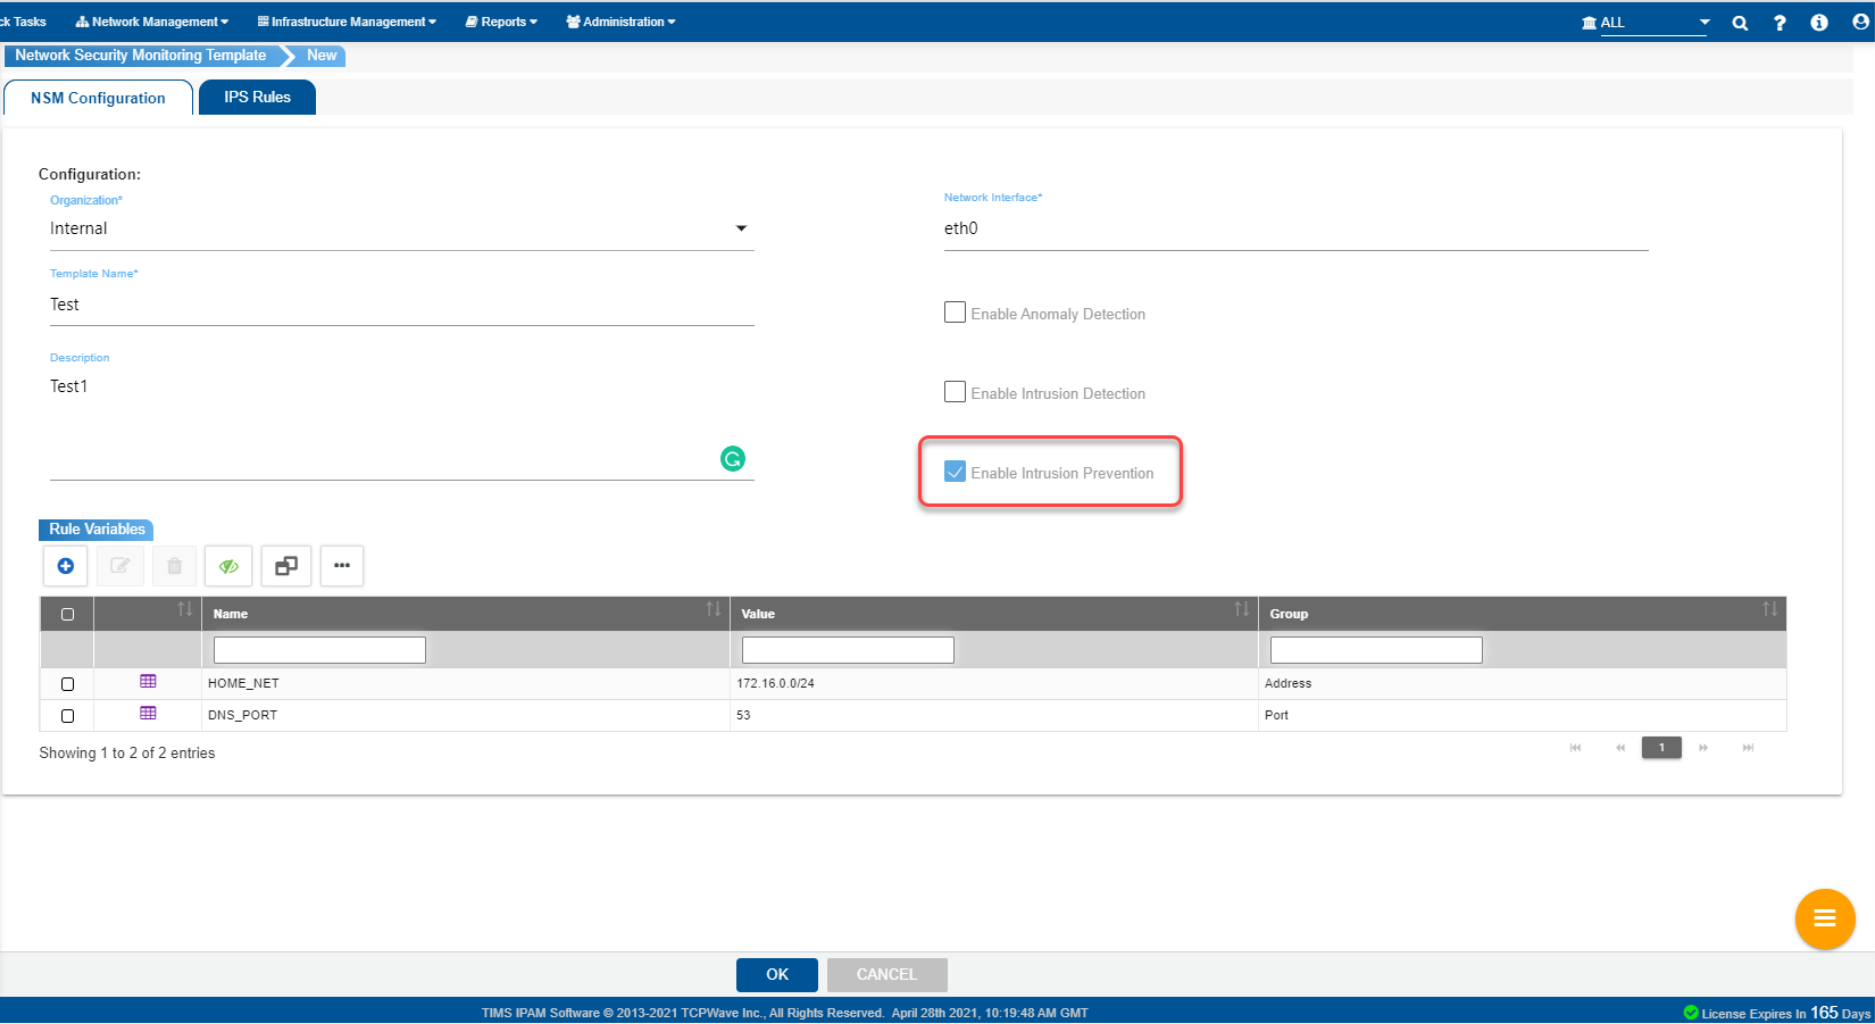
- (Optional) Enter Rule Variables for source and destination IP addresses and ports used in rules. More information on rule variables and entering them is in the TCPWave IPAM Administrator Reference Guide.
- Select OK.
- On the NSM Templates tab, select the Template Name just created to edit the template.
- Select the IPS Rules tab.
- Do one or more of the following:
- Import Default Rules: Select Import Default IPS Rules
 .
.
- Import Custom Rules: Select Import IPS Rules from File.

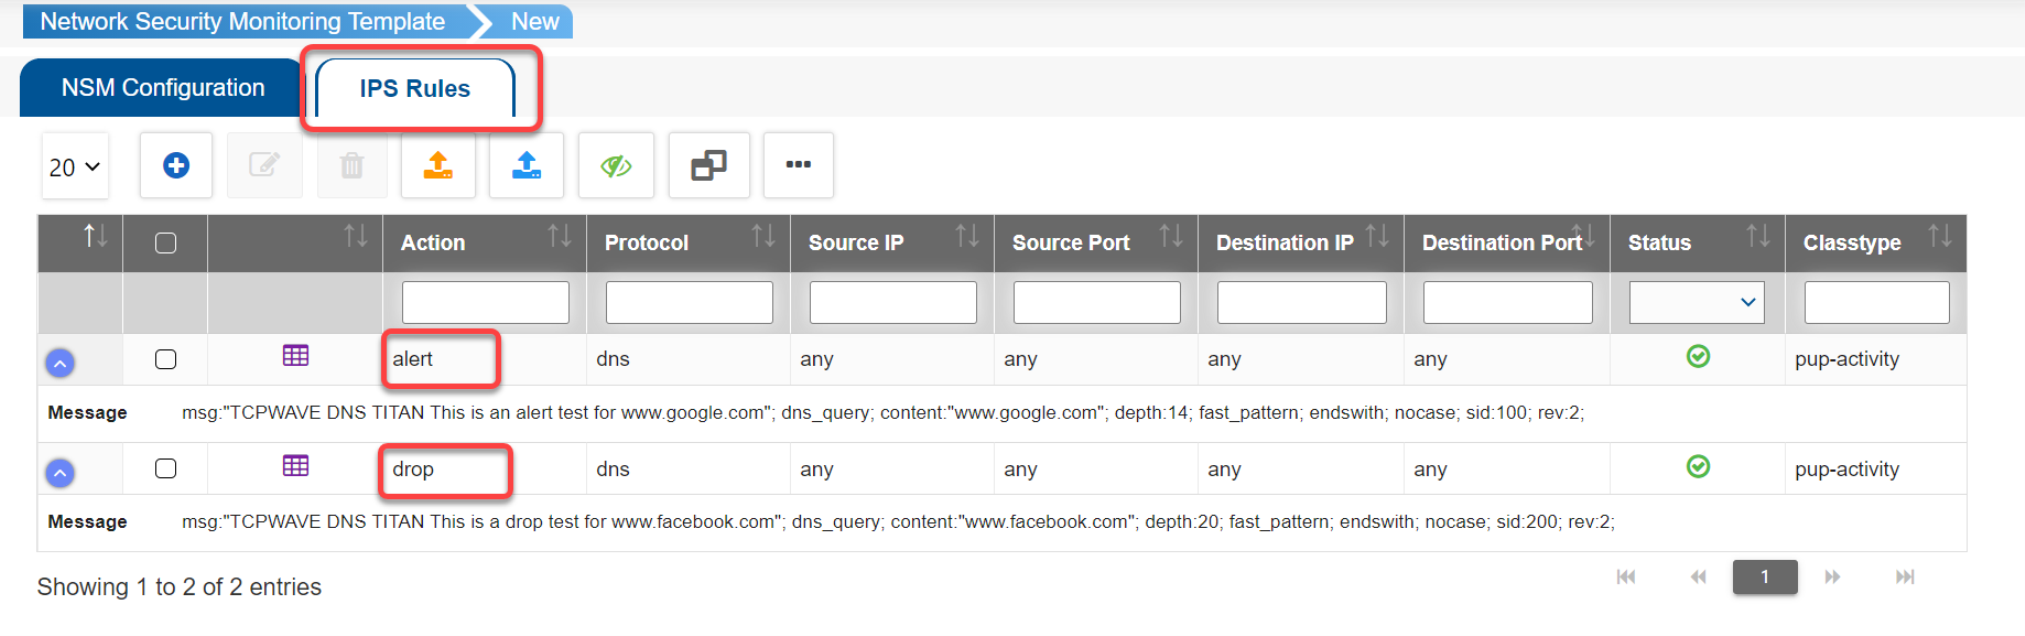
- Create Custom Rules: Select Add, and then enter rule values as needed. After a rule is created, additional rules can be added as needed. Two example rules are shown here and are described below.
Example Detection Rule: The following rule generates an alert if a DNS query is for www.google.com.
alert dns any any -> any any (msg:"TCPWave DNS TITAN This is an alert test for www.google.com"; dns_query; content:"www.google.com"; depth:14; fast_pattern; endswith; nocase; classtype:pup-activity; sid:100; rev:2;)
Example Prevention Rule: The following rule drops a DNS query if it is for www.facebook.com and generates an alert.
drop dns any any -> any any (msg:"TCPWave DNS TITAN This is a drop test for www.facebook.com"; dns_query; content:"www.facebook.com"; depth:20; fast_pattern; endswith; nocase; classtype:pup-activity; sid:200; rev:2;)
For most Actions, including Alert, Drop, and Reject, when a Suricata rule matches the contents of a packet or series of packets, Suricata logs an alert in a line in the fast.log file in the /opt/tcpwave/var/log/suricata directory on a DNS Appliance. (Note that, additionally, Suricata logs alerts and events in the eve.json file in the same directory. This file is in the Extensible Event Format and uses JSON.) The TCPWave monitoring service checks the fast.log file for new alerts every 5 minutes and displays them in the Fault Management section in the GUI.
The contents of the fast.log file can be viewed in the DNS Statistics section of the GUI as well as on DNS Appliances. Example content from the fast.log file on a DNS Appliance is shown in the screenshot below:
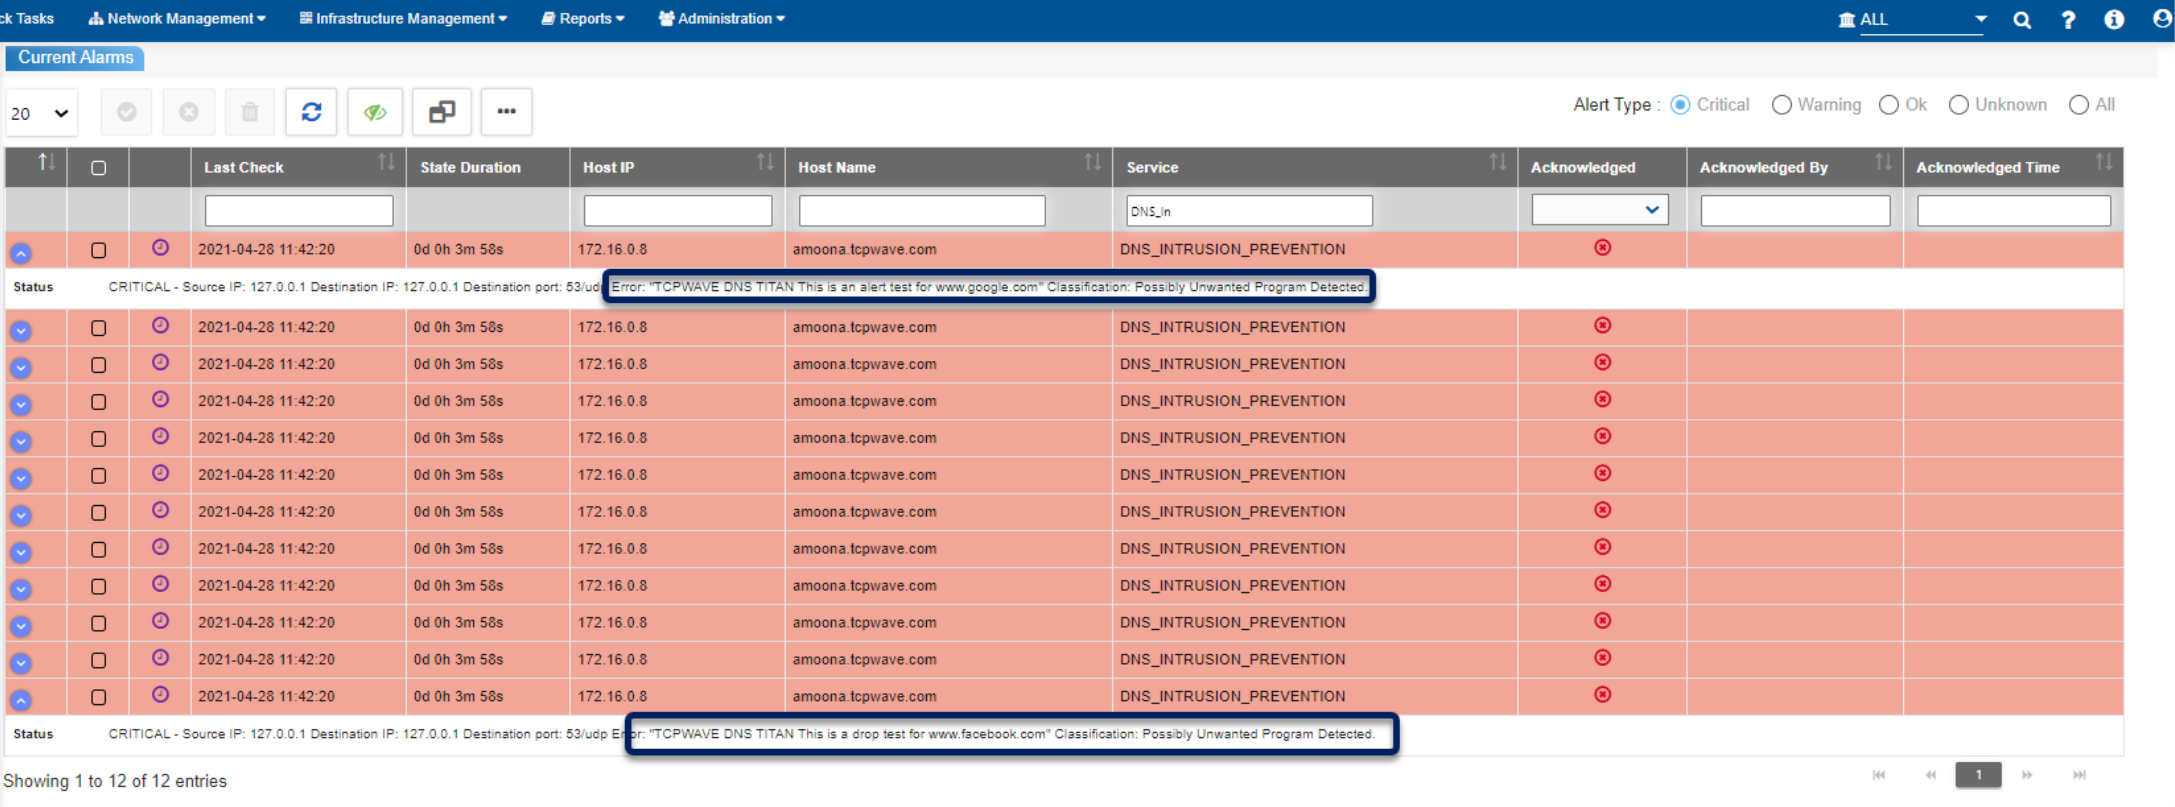
View Suricata alerts
- Go to Infrastructure Management > Fault Management.
- At the top of the Service column, enter a filter value of DNS_Intrusion_Prevention or the first few characters of it.
Note: With default settings, Suricata alerts for the previous 24 hours are displayed. If they are not getting displayed as expected, check the following items:
- Enable Monitoring Service: The Enable Monitoring Service option must be enabled on DNS Appliances that are configured to use Suricata. This option is on the Appliance Configuration tab of each Appliance.
- Enable DNS Network Security Monitoring Alerts: The global option of Enable DNS Network Security Monitoring Alerts must be set to Yes.
- DNS Network Security Monitoring Alerts Purge Interval: The global option of DNS Network Security Monitoring Alerts Purge Interval specifies the number of hours after which old alerts will be deleted, and its default value is 24 hours.
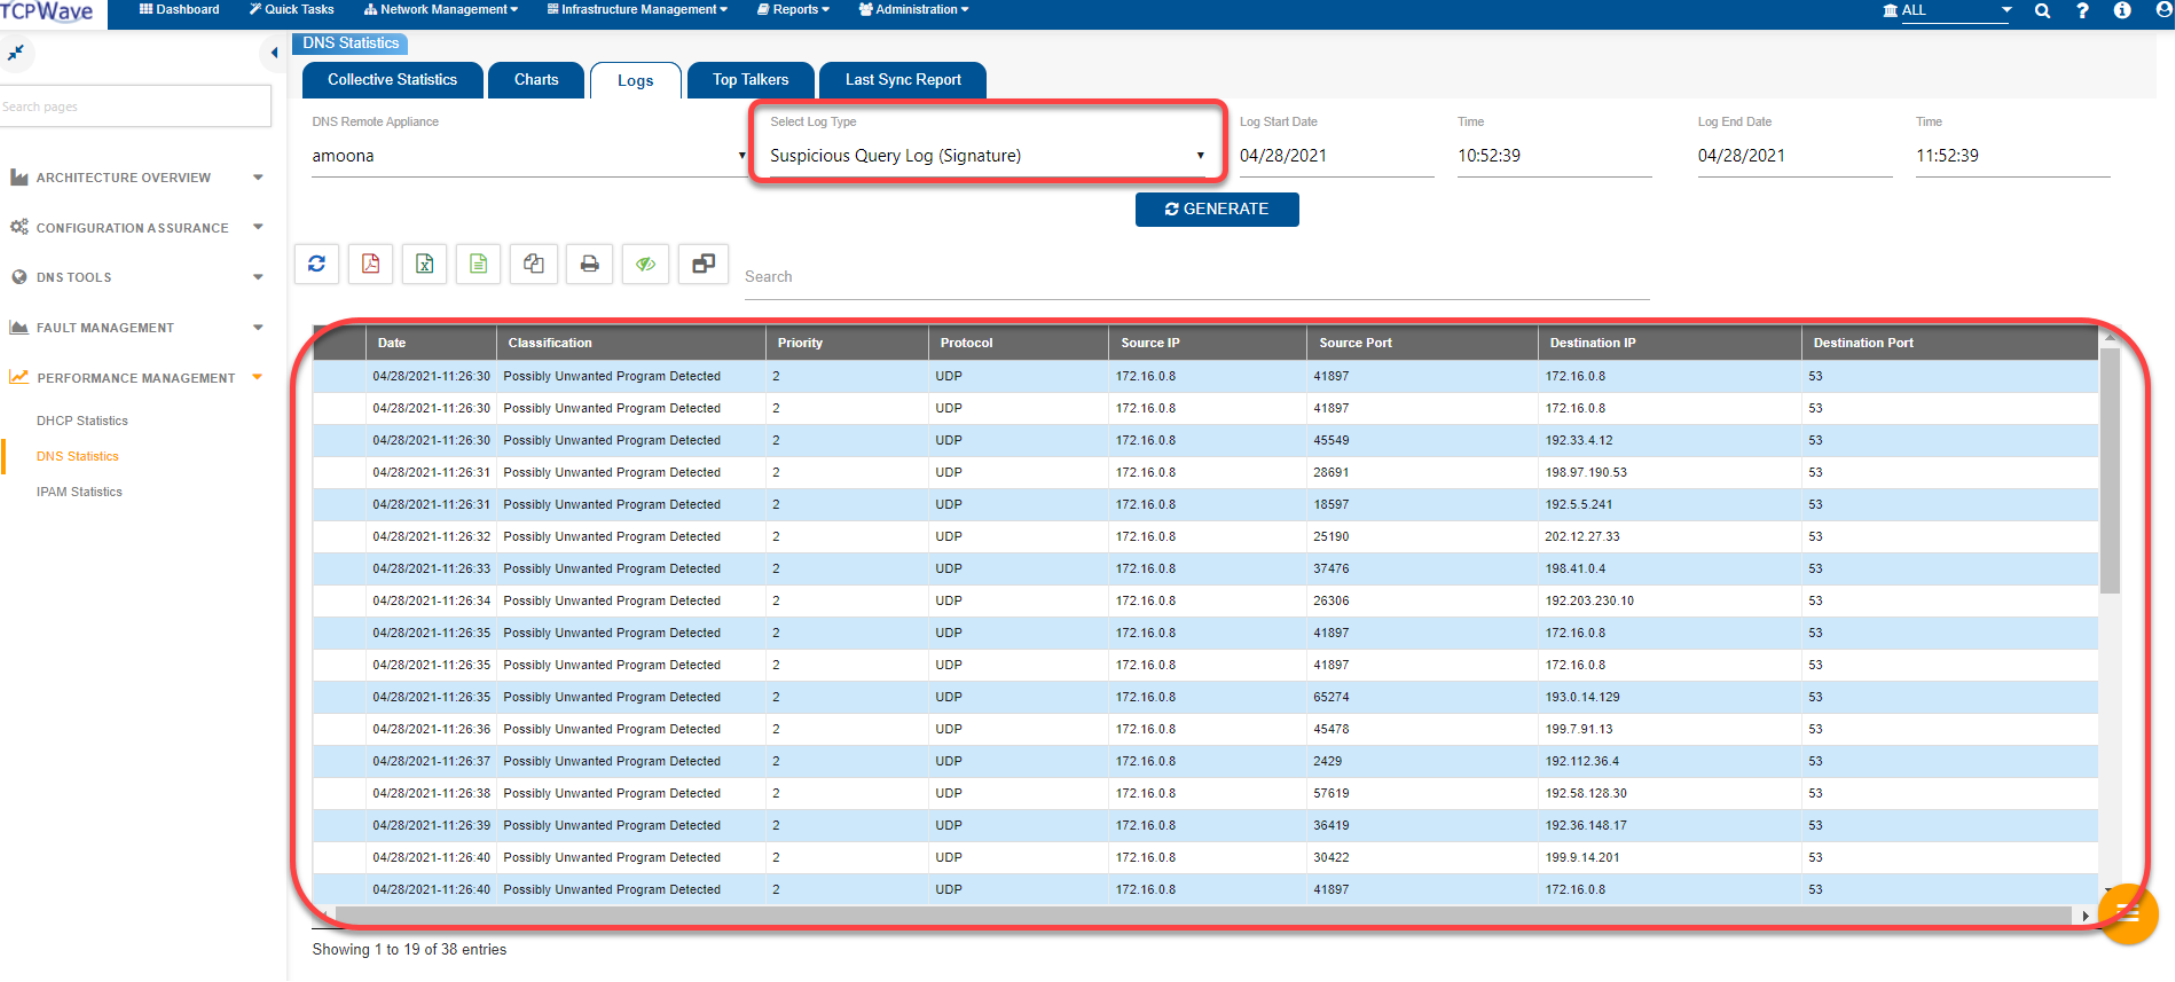
View Suricata log entries
- Go to Infrastructure Management > Performance Management > DNS Statistics.
- Select the Logs tab.
- Select the DNS Remote Appliance of interest.
- Select the Log Type of Suspicious Query Log (Signature).
TCPWave sets a high security standard by offering scalable, integrated, and thorough protection of DNS infrastructure. For more information on how TCPWave and its extensive security features can meet your needs, contact the TCPWave Sales Team